Showing posts with label letter writing. Show all posts

How-to make fabric postcards


It is no secret that I am a huge snail mail fan and I’m always on the look out for ways to make my mail unique. A while back I had the idea to make postcards out of fabric which could be sent and the receiver could keep as keepsakes. I knew exactly how I was going to do it. Being able to choose fabrics from the Sew Crafty shop as a part of the Sew Crafty Design Team made it so much more exciting, they have such a gorgeous selection to pick from. I chose some lovely fabrics that I think make nice postcard fronts. Here is how I went about making the fabric postcards:


You will need:


Step 1. 

Cut out 2 rectangles 19 cm’s by 15 cm’s (approx 7.5 inches x 6 inches): one in white fabric for the writing side and another one in a patterned fabric.


Step 2. 

On the white fabric rectangle draw out your written message and postcard lines with chalk or a fabric pen with erasable ink. Then using embroidery thread (dark colours like black work best) sew on top of what you have drawn using a running stitch or backstitch.


Not a fan of embroidery? Why not use a fabric pen instead. I did this for the address below. A pen for labelling works as it is permanent. I already had a pen but there are a variety of pens available.


Step 3.  

The next step is the stamp.

Option A.

Stamps out of fabric. Cut a small rectangle out of white fabric (cotton, felt or leather. I used leftover interfacing!). Then use pinking shears to cut a zig zag shape around the four edges. Cut a smaller rectangle out of patterned fabric. Then sew the smaller patterned fabric on top of the white zig zagged rectangle. Finally, sew the stamp to the right corner of the writing side of the postcard leaving a margin for when the postcard is sewn together.


Option B. 

This option is if you would like to actually send your fabric postcard through the mail. Simply sew a rectangle piece of flexible clear plastic (such as that from an old travel card wallet) to the right hand corner of the white (writing side) fabric. 


When sewing on your plastic leave a margin for when the front and back fabrics are sewn together.


Step 4. 

Place your 2 rectangles of fabric right sides together and pin in place. Then sew along three sides (1cm from edge), leaving one short side open. 


Trim the corners and turn the postcard the right way round.

Step 5. 

Put your piece of card inside and fold in the open edges. Iron the folds (don’t use steam as this will make the card inside soggy) and pin together. You can invisible stitch the opening closed or sew it closed with a sewing machine in the final step, where you sew all around the edges.


Step 6. 

Finally, sew around all four sides approximately half a centimetre from the outer edge. 


Here is how the fronts of the postcards looked above. The pink one is actually a pouch.


Here are the backs of the postcards showing the two different types of stamps.

Pouch option: 

If you would like to send a secret letter in your postcard you can turn it into a pouch. You can do this  by sewing a zip either at the side or along the top.


For the pouch above I sewed the zip along the top edges of the fabric then sewed together the remaining three sides (right sides together) using a 1cm margin. I then turned it the right way around and gave it a quick press with an iron. Put a piece of card inside for stability if it is to flimsy. You could keep it as a pouch for yourself and not send it at all if you wanted. Would be great for storing letters or pens.


Would you like a fabric postcard in the mail? Would love to know your thoughts in the comments section below.

Junk food mail art


This week I made this junk food mail art envelope out of some chip gift wrap paper (bought from a Tiger store), a takeaway leaflet, a piece of white paper and an envelope. I started off with covering the envelope with the chip paper then gluing a burger cut out of a leaflet onto the bottom corner. I then cut out and glued a receipt shape out of white paper and applied the stamp at an angle to look like a little flag (flag stick shape cut out of a post it note). I then used a pencil to add a bit of detail. Do you think the postman will feel peckish when he sees this envelope?


I post all my crafty makes on Instagram if you would like to see them you can follow me there to. 

Easy mail themed wall art using washi tape


I really love art and have been meaning to create a piece to go on my wall for ages. I particularly like the idea of doing a painting and went as far as buying the canvas, paints and brushes. My problem is  that I am not confident enough to actually put any paint on to the canvas. I get thoughts like "What if I make a mistake and can not cover it up? What if I don't like it when it is done? Do I throw the canvas in the bin?" So I never start. I looked online at other mediums I could try and was inspired by some washi tape art I had seen. Washi tape seemed the perfect thing to create a piece of art with. It is so quick to apply, easy to change/remove if you make a mistake and as I am not short of washi tape, cheap to put together. I knew straight away what the subject of my art would be, my love of letters (of course).


So I started off by sketching out my design. I then practiced placing the washi tape on sheets of paper a few times to see where, how and what size the strips of washi tape should be. Once I got it how I liked on the paper I just copied it onto some thin card. I measured the lengths of washi tape against the practice version I had on paper to get it the same but you could lightly draw the design with pencil and go over it with tape if you prefer. If you want to use paper instead of card for your art you could simply trace onto a new sheet of paper with tape over the your practice sheet.

To make this washi tape art all you will need is:
  • A frame (mine was from a charity shop).
  • Thin white card or paper same size as your frame.
  • Washi tape (colours according to your preference)
  • Scissors
That's it! A very quick and easy piece of art dedicated to happy mail, what do you think? Hope you like it.


Decorating mail on a budget


Having over spent a little (o.k a lot) on stationery earlier this month in the January sales, I have vowed to budget my stationery and craft spending for the rest of the year. One of the areas I plan to save on is letter writing sets. I am quite partial to a lovely letter writing set that has nicely designed writing paper inside but they can be expensive. So all of my letters for the next few months at least will be written on plain paper that I have hand decorated and embellished with items I already have  amongst my craft supplies. Here is a letter I have decorated with some bits and pieces I had tucked away in drawers.


All I used to decorate the outside of the letter is a paper doily, twine, buttons, paper clip, a couple of pictures cut out of magazines, a small piece of fabric and a used stamp. I am quite happy with how it looks considering it cost me nothing!


A parcel (letter) in the mail


Here is a simple way to decorate your envelopes that will make your recipient feel they have received something special in the post. Letters can be uplifting, encouraging and perhaps even a source of therapy for some. So getting a letter can often feel like a gift when they arrive. Someone has, after all given you the gift of their time. Decorating envelopes in the style of a present seemed very apt to me.


All you need to do to re-create this look is cross over some washi/decorative tape on to the envelope and stick on or draw a tag for the address. Any extra details and the address can be added with a pen. 

If you do not have any decorative tape why not try drawing the criss cross shape with a pen (such as felt tip or marker pen) instead. A present in the post, would it be something you would like to receive? I would love to know what you think?

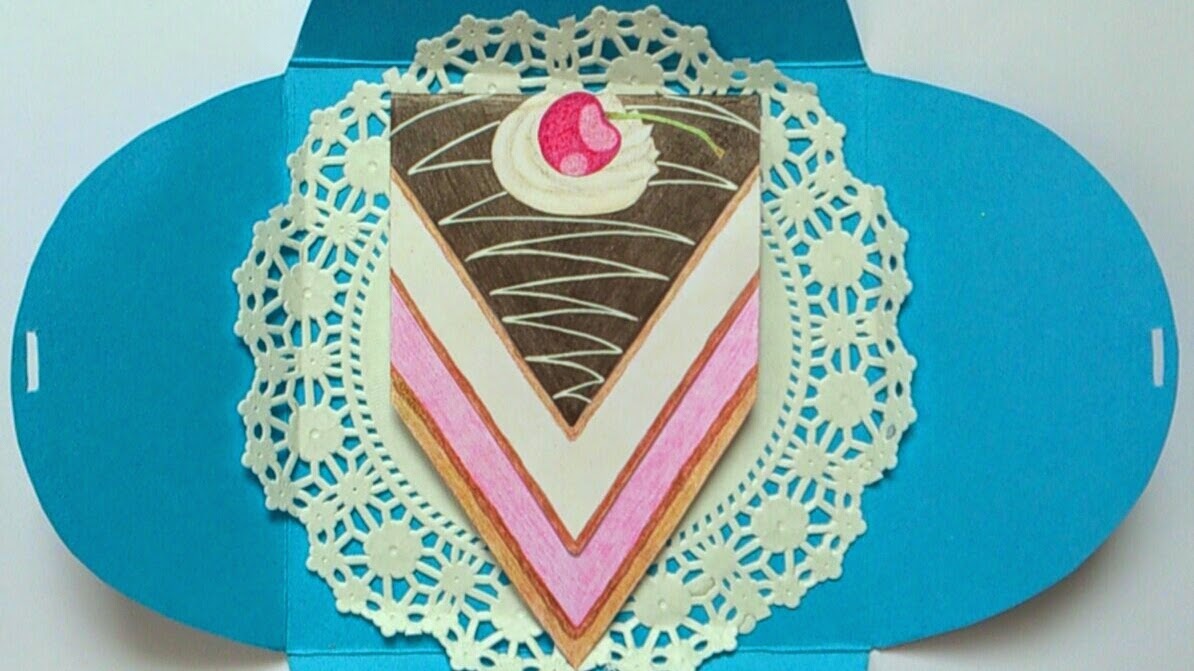
Mail art: A slice of cake in the mail!


Following on from my sandwich in the post I have made a slice of cake (card). I wanted to send my friend a card and some cake but as cake doesn't seem to travel well this was the compromise.


It took me a little while to figure out how I was going to do it. I wanted to be able to open it up and write a message inside, so this is the design I settled on. I used a medium weight white card and just some ordinary colouring pencils and a white pen to draw the details.


This is how the cake card looked closed up in its envelope. Hopefully my friend will have some real cake available to eat in case the card makes her feel hungry. Hmm, I'm feeling a bit peckish myself now. Cake anyone?

Mail art kit in the post


When my penpal wrote in her last letter that she struggled to find nice writing paper I totally empathised. I've also found that nice, reasonably priced writing paper is hard to come by. I started to look at ways I could create and decorate my own writing paper instead. I found so much inspiration online through Pinterest (see my mail art board here) and Instagram so quickly started to make my own. I thought I would share with my penpal the ideas and inspiration I have picked up and put together a little mail art kit to brighten up her mail.


Included in the kit I made were; stickers, twine, magazine cutouts, some diy stamps with blanks to make up (see my how-to here), washi tape, bunting and some extras (paper clips/ tags/ washi flags).


My favourite packet I included in the kit was the magazine cutouts. Above is what I included inside. I like to create mail art using drawings but it can be very time consuming. I think you can create results just as nice using magazine cutouts. There are lots of lovely pictures in magazines. It's so simple, just cut out a picture you like, position and glue it to your writing paper or envelope. Below is an example of what I make.


With the mail art kit I also put in some suggestions (see below) for decorating mail. I often draw things instead of writing them down. Am I the only one who does that?


So there we have it, a diy mail art kit. Hope you've enjoyed reading.

Mail art: A suitcase in the post!


This envelope is ready for it's travels! I have transformed a boring brown envelope into a suitcase using a bit of mail art. I am often disappointed by the end result of the things I make, does it ever happen to you? I will imagine how an idea will look but then the finished project is a bit disappointing. It happens to me all the time! This envelope however, turned out exactly how I imagined and I am actually pleased with it.

All you need to make one like it is:

  • An A4 size brown envelope
  • Brown colour washi/masking tape
  • A label
  • Glue
  • 2 key rings 
  • Eyelet plier and 2 eyelets
  • A selection of different country stickers/drawings/print outs from the internet
  • White pen
  • Scissors
  • Handle that has an opening or loop on each end to allow key rings through (can be made from cardboard/fabric or as in my case taken from a zip attached to a purse).
These items are what I used but they could be substituted with alternatives if you can't find them. For example; you could draw the straps and corner ends with a brown pen instead of using washi tape.

1) I started with putting the eyelets in.
2) I then applied the brown washi tape (as shown in the photos)
3) I pulled each of the key rings through the handle ends and then through the eyelet holes. I also put my Buckingham Palace stamps (not the ones I wanted but my post office sells out so fast) at this stage. Please note that with the eyelets in place a flat A4 document will not fit inside, it would need to be folded.
4) Finally, I glued my stickers and label in place. Tip: play around with how you want the them arranged before sticking down so that colours are spread out and the address label can be seen clearly.
All done!


My first attempt at hand carving stamps


I have come across so many nice handmade stamps lately on Pinterest and couldn't wait to have a go at making some myself. So I bought a linoleum cutter and a load of erasers and off I went. There are many lovely examples out there so it was easy to find inspiration (here is my stamping board on Pinterest). I have found it so much fun!


All you need is an eraser, a pencil to draw motif onto the eraser, ink and a linoleum cutter. The envelope stamp above was inspired by a pin I saw on Pinterest. I have started making my own cards as well as decorating writing paper.


There are tutorials on the web for learning to carve stamps such as this one by Ishtar Olivera. I confess though that I went straight into carving without any know-how. The results were not great at first and I cut my fingers a ridiculous amount of times (those linoleum cutter blades are sharp!) but the results did get much better with practice. I would still recommend looking at a tutorial first though, I would have saved quite a bit of time and plasters if I had done so!

My favourite stamp I have made so far is the earth stamp. Here are a couple of examples of how I have used it.


If you are getting into stamping to I would recommend buying this book by Geninne Zlatkis. I just have and I think it's really good. It has detailed instructions on how to carve stamps and use them on different types of materials including fabric and stone. The book has lots of lovely photos and illustrations throughout showing examples of ways you can use your stamps, as well as templates you can use at the back. I found it really inspiring and it is now one of my favourite books. I am always on the look out for more stamp related tutorials/ books so recommendations are very welcome. 

A sandwich in the post!


I have been planning on making my own stationary and cards for a little while now. This is my first try, a sandwich card! All I can say is I must have been a bit hungry when the idea came to me. I wanted the card to look like a sandwich when closed but could also open up and have quite a bit of space for writing.


I used different coloured card for the cheese, tomato's and lettuce and tried to make the front have a more bread like appearance by using some colouring pencils. I am thinking about doing cake for the next one!